Wednesday, November 20, 2013

Spanish Roasted Pepper Dip/Salad Dressing

http://childsposefertility.com/wp-content/uploads/2010/09/Roasted-Red-Peppers-005.jpg

I really really enjoy Spanish food.  Actually if the culture is "latin" I'm pretty much into it.  Spanish food is so so fun because it's such a melting pot of European, Middle Eastern and North African cuisine.  This is not strictly a salad dressing but can also be used as a sauce over a baked potato, pasta, fish or chicken.  Also, would make for a wonderful party dip.  Just watch the amount of water that's added to get the "dip" consistency.  I poured this dressing warm over my salad for lunch and it was truly wonderful.  Because I was out of paprika it wasn't used in this recipe BUT I may try it next time.  Great for the winter.  Red peppers, onions and garlic give the body lots of fighting power against colds other contagious bugs out there! This is a thick salad dressing and will make about 4 cups.  If you'd like it thinner, add more water.

  • 3 Red Peppers
  • 2 Red Onions (small size or, 1 large/med size)
  • 1 Head of Garlic
  • 1/2 cup water
  • 1/4 cashews
  • 1 Tbsp. reduced sodium soy sauce (or liquid amino acids)
  • 2 Tbsp. Balsamic Vinegar
  • 1/2 tsp. rosemary
  • 1/2 tsp.  thyme
  • 1/2 tsp. turmeric
  • 1/4 tsp. white pepper
  • 1/4 tsp. cayenne pepper
Prepare a baking sheet by lining it with foil and spraying it with oil/non stick cooking spray to prevent sticking. 

Cut the stem and seeds out of the red peppers, cut the top off of the head of garlic (no need to remove the skin see the below link to youtube clip), cut the red onion in half and remove the skin. Place all veggies on the prepared baking sheet. Broil in the oven for 10-15 minutes.  Until the skin is blackened on the veggies a bit.

Remove them from the oven and using tongs, transfer peppers and onions into the container of a high powered blender (a food processor may work for this as well). 

The head of garlic is a little different.  For those out there who have never roasted garlic and removed the skin afterward check out this youtube clip.

At about 1:18 of this youtube clip, it will show watchers how to remove the pod from the skin.  Once you've squeezed all the garlic out, discard the skin and place the pods into the blender container as well. 

Now just add all the other ingredients into the blender.  Blend on high until all ingredients are blended smooth or, to your desired consistency.  Voila! you've got a warm and delicious salad dressing without gobs and gobs of oil.


Labels: , , ,

Friday, August 02, 2013

Chipotle Lime Yams (Also known as "Sweet Potatoes")

These brought me back to some shrimp I made years and years ago (never mind how many years ago) for a party when I was fabulously 20 years old and living in San Diego less than a block away from the beach......yes, those were the days.  We were having a neighborhood party and I had made Chipotle shrimp I cruised around with a big bowl of them in my hand and a cowboy hat on my head.  I thought I was so cool.  The "cool" part has never been proven but the shrimp was a proven hit.

Now that I am going back to my roots with the whole "no shell fish" kosher rule, those little bottom feeders are no longer passing my lips.  But this creation really took me back-- in an uber good way.

This recipe has just about everything.  Sweet, salty, smokey, sour & spicy.  Right now the ingredients go under the 90/10 rule.  The "10" is the Embasa Chipotle Peppers in Adobo Sauce.  A quick glance at the back label shows oodles of things I shouldn't be indulging in right now (vegetable oil, wheat flour, salt, caramel color, etc.). If there is another canned version of Chipotles in sauce that is healthier,  I unfortunately don't have that option living where I'm living. These are vital to the recipe though.

  • 2 large sweet potatoes (or "yams" depending on where the reader has grown up)
  • One Chipotle Pepper in Adobo sauce (I use Embasa canned Peppers)
  • 2 Tablespoons of Chipotle Sauce  (from the same can that the peppers came in)
  • 2 Limes
  • 4 Tablespoons chopped fresh cilantro
  • 1 Teaspoon reduced sodium soy sauce
  • 3 cloves of garlic
  1. Preheat oven to 400F
  2. Peel yams and cut them into 2 inch chunks.  Place these on a parchment lined baking sheet and into the preheated oven.  Roast these for about 45 minutes or until preferred tenderness.
  3. Use a fork remove a chili from the can and place on a cutting board. With a chefs knife, mince up the pepper then slide it on into a large bowl.  
  4. Combine chipotle sauce, lime juice, lime zest, soy sauce, garlic and cilantro all into the same bowl. This is the sauce or dressing. 
  5. When the yams are ready, take them out of the oven and dump them hot into the large bowl with the sauce. 
  6. Using a large spoon mix the yams in the bowl until they are coated with the sauce.  
This makes a great accompaniment to any meal.  Ad some black beans and lay them on top of some salad greens or peppery arugula.  YUM!  Watch out though! These suckers are spicy and addictive. 


Labels: , , , ,

Spicy Mango Avocado Salad

This one is another creation that can be eaten "as is" or it can be fancied up by rolling it up into a whole wheat wrap with some lettuce greens.  Better yet, skip the whole wheat wraps, add a can of beans of your choice (rinsed and drained), and wrap it up into a leaf of Romain lettuce! If you are a carnivore, lay atop some grilled fish, chicken or steak to ad a great flavor without any extra fat.

  • 1 large ripe mango (Peeled and cut into half inch cubes)
  • 1 avocado (Peeled and cut into half inch cubes)
  • 2 Tablespoons of fresh chopped cilantro
  • Juice of a good quality lemon or juice of 2 not so good lemons (about 3-4 Tablespoons of juice)
  • 1 small white onion (finely minced)
  • 1 Jalapeno Pepper (finely minced)
  • 3 cups or more of baby spinach (optional)

In a medium bowl, mix all the above ingredients until blended well.  Enjoy!


Some notes:  For information on cutting a mango click here

Regarding avocados, I prefer Hass avocados.  These have the darker skin.  For a tutorial on how to cut an avocado click here  Another quick note about avocados:  Even though the tutorial that I linked (and just about every tutorial on avocados that I could find) advises one to hack the knife into the pit of the avocado to remove it, I don't advise this.  It's dangerous and unnecessary if the avocado is ripe.  I've always been able to use my fingers to pull out the pit. It usually dislodges easily from the meat of the fruit.

Labels: , , , , , ,

Saturday, July 27, 2013

Watermelon "Slushie"

Yes, I live in Germany....and no, the temperatures do not get up into the 100's during the Summer like they do in the states.  HOWEVER, there is no air conditioning and the humidity is stronger here than where I am from originally.  To keep the explanations short, it's flippin' hot here right now!  I'm doing everything that I possibly can to cool down including of course making new recipes.  This one is also great because stores are stocked with (to use a technical term) ginormous watermelons and my family can never seem to finish one before it turns into some slimy creature in the back of my fridge.

To come up with this healthy treat, freeze your watermelon in chunks!  Viola! 

Free of refined sugars & fats, dairy, wheat, and meat free, this makes for a guiltless cool down treat.

  • 2 Cups of Frozen watermelon (Cut into chunks about 1.5 inch and freeze in a baggy overnight.  Don't worry about the seeds!).
  • Juice of 2 limes
    1 Banana
  • Water

  1. The watermelon may have stuck together during the freezing process.  To dislodge watermelon, pound the ziploc bag on the floor a few times or, take your "man tamer"---AKA: meat tenderizer to the baggy.  Dump the frozen chunks into a blender. 
  2. Ad lime juice and banana as well to the blender with the watermelon.
  3.  Blend ingredients together adding water when necessary and until that nice "wirlpool" forms. When the wirlpool is scene, it's ready
  4. Poor into cups and drink.  This makes about 2 servings. Depending on your taste buds, ad some sweetener.  I recommend stevia, maple syrup, honey, or a few dates in blended with the slush.

    Now, the little devil in me says to ad two shots of Vodka (Rum or Tequila might work too) but I'm off the hard stuff for a while so I'll leave that to the readers imagination.

Labels: , , , , , ,

Saturday, June 29, 2013

Crystallized Pansies

My pansies were on their last leg when my neighbor came over the other day.  She looked at them and informed me, "you know, you can eat those."  this definitely got the gears turning.  I recall reading about preserving spring flowers.  Preserving flowers whether dried or pressed is fairly popular here.  There are many homes with framed pressed flowers from the area.  But edible and preserved?! Yes!  In one of my many cookbooks, 'Forgotten Skills of Cooking' the author explains how to crystallize flowers using sugar and egg white.  They are used to decorate pastries and cookies and, are completely edible. I did a quick search online and found out that to purchase 3 dozen crystallized pansies, it cost me around $40.  NOT CHEAP! If not anything else, making them myself would be cheaper.

So here's my updated recipe to crystallizing pansies:

  • Dry pansies (It's important to pick them on a dry day or, pick them and sit them overnight in a vase)
  • One egg white
  • Bakers sugar or regular sugar that's been grinded up fine in a food processor
  • a splash of vodka (optional but it serves to help dry the flowers quickly)
  • soft paintbrush about a standard watercolor size
  • baking sheet lined with wax paper
  • a small strainer to be used as a sugar sprinkler.  I used my reusable tea strainer from Ikea
  • scissors


  1. Mix egg white and vodka in a bowl.
  2. Prepare your work space. Assemply line style or, egg white bowl with pain brush, flowers in vase, sugar with "sprinkler", lined baking sheet.
  3. Snip stem off as closely to the bloom as possible
  4. Using the paint brush dipped in egg white vodka mixture, brush every inch of the flower (front and back of each petal) with the mixture.
  5. Sprinkle sugar all over the flower as well. Front and back.
  6. Place flower gently on lined baking sheet
  7. Repeat with all the flowers.  After about 3 days the flowers should be dry.

Place them in a loosely packed box.  A shoe box is good for this.  Be sure that the box doesn't seal.  They should be preserved for about 6 months.
Your family and friends will be really impressed!  It's takes some work and patience and you may have some duds....but, they look gorgeous on top of cupcakes.  I used mine on homemade lemon cupcakes with a lavender frosting.  So Victorian & British!

If you don't have the patience to do this, be sure to "harvest" your pansies and put them in your salad for a change of pace. Apparently they can be used in tea as well.  For more information on home remedies and the health benefits of pansies click here.


Labels: , , , , ,

Thursday, August 30, 2012

Middle Eastern Style Coconut Date Rolls

The internet can be like the black hole for me.  I check out one youtube clip and the next moment, I find it's been an hour and I really don't know where the time has gone.  Sometimes the journey through the black hole can be rewarding though.  Recently I came across the Mama Natural channel.  On one of her recent videos (click on her name above to view) she mentioned coconut rolled dates.  Now, I don' know if this is the absolute same thing as what is in her video but, I think it's pretty darn healthy all the same.  Coconut date rolls are a middle eastern treat.  Mainly they tend to be served with tea.  Off of this recipe, I made my own out of what I had in the pantry. Now, next time, I think I'll give almonds a try like the original recipe but the walnuts worked out great.  The honey may not be necessary for everyone.  For me, I felt it helped make the mixture adhere more.

5 oz. dates
1/4 cup walnuts
1-2 tsp. honey
unsweetened coconut (maybe 1/4 cup for this recipe)

  1. Place dates and walnuts in the food processor and pulverize them together.  This may take a few minutes. You'll know it's done when the chunks are for the most part gone and you can rolls the "paste" into balls or rolls.  If it's not happening, the honey helped.  Just put a little bit at a time! 
  2. Roll the "dough" or "paste" into rolls or balls.  
  3. Pour coconut onto a dish
  4.  Roll the formed balls or rolls in coconut to coat

Now, mama natural claims these taste like fudge.  I'll leave that up to the taste testers out there in internet world.  For me, it's not completely like fudge. (I don't know if it's humanly possible to duplicate fudge and still be healthy.....) but the texture really is phenomenally close. Honestly, that's what I crave the most when I'm craving brownies or fudge....the texture.  That oooey gooey rich loveliness.  This combined with the sweetness really does the trick.  I can eat a whole bunch of them and not feel totally guilty. With no chocolate or dairy this really could turn into a family (or mommy) favorite! Completely parve (kosher for passover too) and vegan.  Healthy walnut fat for the brain and date sweetness for energy makes these the perfect after school snack (seriously, my eldest loved them).


Labels: , , ,

Thursday, August 09, 2012

It's a Little Corny (Corn Salad)

The above is sorta a joke and sorta not.  Corn has a bad rap in some circles (and I'm not talkin' crop circles here).  There are a lot of reasons as to why this is but, hey, I'm gonna stick to the "everything in moderation" rule when it comes to corn.  Corn really has a rich history.

"Corn is perhaps the most completely domesticated of all field crops. Its perpetuation forcenturies has depended wholly on the care of man. It could not have existed as a wild plant in its present form." -Lance Gibson and Garren Benson, Iowa State University, Department of Agronomy
Revised January 2002

Where I'm from, we purchase sloughhouse corn during the Summer. White sweet and wonderful strait off the grill.  So sweet it can be eaten raw.

Unfortunately, here in Germany, corn isn't such a smash hit when it comes to consuming it off the cob. It's hard to find fresh corn. I've heard too that the French think America's fascination with eating corn is odd.  It's used for animal feed (or, fish food) in a lot of cases over here.

Because it's so hard to come by fresh corn, I'm using frozen corn in this recipe but it's still really good, light, and easy!


  • 16 oz. bag of frozen corn
  • 1 medium to small red onion  (diced or minced)
  • 1 jalapeno
  • A hefty handful of cilantro (about a cup minced)
  • 2 cloves of garlic
  • 1-2 limes ( or, about 1/4 cup lime juice)
  • 1 Tbsp. olive oil
  • 1/4 tsp. cumin
  • 1/4 tsp. chili powder
  • 1/2 tsp. salt
  • 1/4 tsp. pepper


  • Place corn in medium size bowl with onion, jalapeno, and garlic.  In a separate bowl, combine lime juice, olive oil, cumin, chili powder, salt, and pepper. Chill in the fridge for no more than 24 hours (after that amount of time, we are getting to the "mush" danger zone) Before serving stir in cilantro. 

A couple side notes.  If cilantro is hard to come by or too expensive, coriander spice can be added instead.  It also saves the chef from having to add fresh at the last minute before serving.

This corn salad makes a great side dish with carne asada style steak, on top of a white fish, or even chicken.  For a whole vegetarian meal, add a can of drained rinsed black beans before chilling.  Maybe some sort of cheese can be added as well (cubes of cheddar or hardish queso cheese?).  But, if cheese is added, one may need to add that before serving to avoid slime cheese effect. Place a hefty spoonful on top of lettuce greens.  YUM!


Labels: , , , ,

Friday, March 30, 2012

Graham Cracker Chocolate Peanut Butter Bars

This Friday night for Shabbat, it's "get rid of Chametz" theme. So for after service noshing, it's gonna be a carb overload. For anyone who is not familiar with Jewish Passover, or the word Chametz. Here's a completely cliff notes version. During passover, Observant Jews rid their homes of Chametz or, any leavened bread. This includes crackers, bread, cake, cookies, flour or, other wheat products that aren't made of Matzo and deemed Kosher for Passover. If a person is very observant, they kick spring cleaning up a notch for sure! For more details and history, click on this.

This film shows an Ethiopian-Israeli Passover clip from Shalom Sesame

Another one for anyone wanting a good laugh.....this is a great video

Our cat has been missing for almost a week now and there's a camping trip that I'm getting the boys ready for tonight so, I needed something quick and easy. Enter Chocolate Peanut Butter Bars

This is a "simple as pie" recipe and for the most part requires things that I usually have on hand.

These turned out great and reminded me of a recipe that will most likely stay a mystery. I know that my grandmother made these fabulous graham cracker bars that my Dad loved. With her passing went the recipe and our family has been on a constant mission to find something like it.

Every time I roll out with a new graham cracker concoction I think about my grandmother. I was a product of a blended family. Although it had it's challenges, having extra grandparents wasn't one of them. This grandmother became my grandmother when my mother remarried. Although she was technically a step-grandmother, she was a real grandmother in every sense of the word. I consider myself very blessed because it wasn't until 9-10 years later until they had another grandchild. I had them all to myself and I think I truly was to them, in many ways, their first grandchild. These were the classic grandparents who watched me during the Summer time when my parents worked and I was out of school. They knew every single goody I liked and made sure to stock pile their pantry. This grandmother taught me cooking, tips on laundry and cleaning, how to crochet....which I've long forgot, made sun tea in the Summer, and showed me the joys of gardening. There are many things that remind me of this grandmother: the smell of Dove soap, my favorite pink afghan that she made for me, and Graham cracker bar recipes.

Labels: , ,

Thursday, February 09, 2012

Just Beet It


The other day I was watching Doctor Oz (and eating bon bons....HA! Ya right) and he had a guy on there who memorized 52 decks of cards. He is in the Guinness Book of World Records. His memory is impeccable. Guess what his #1 food is for keeping up his memory? The very humble beet. Yes, beets. Apparently beets are recommended to Alzheimer patients as well to help brain power.

This isn't the show I watched but, here's a link to more info about beets: http://www.doctoroz.com/videos/antioxidant-youre-not-eating

I really like beets. I always have. Even when I was a little girl I ate them in my salad. Maybe it was their color that did for me but I always really liked them.

There were no fresh beets at the commissary. I should have looked out in town but, I was lazy so I went to the canned food isle (which by the way, I found the large cans of Organic diced tomatoes for $0.30 a can.....REALLY! That was my cheap thrill for the day! I bought what was left on the shelf.) this turned out pretty well. My kids turned their nose up at it....but hey it's beets not ice cream. One day, I hope they will appreciate healthy food on their own. In the mean time, I'm gonna keep trying.

Easy Beet Salad

2 Cans of Beets cut into bite size chunks. (Just boil fresh ones....use the greens too!)
Spinach Leaves roughly chopped (If your using canned)
2 large cloves of garlic (chopped, mashed or crushed)
4 Tbsp. olive oil
2 Tbsp. vinegar
Salt & Pepper to taste

Place beets, Spinach, and garlic in a medium/large bowl. In a small bowl wisk together olive oil, vinegar, salt & pepper. Pour liquid/dressing over beets and toss.

Let this sit a little while before serving. The dressing will help mellow out the fresh garlic.

Yesterday we had this because it was a "Greek" style dinner. It was also Tu B'shevat the Jewish New Year for Trees (Also nicknamed the Jewish Arbor Day or Jewish Earth Day). Because we had record cold here in Germany, Planting a tree was a little bit out of the question. So, I bought an indoor palm. His name is Willard. With the Mediterranean style dinner and Willard "standing watch" it was a nice holiday evening.

Labels: , , , , ,

Monday, February 06, 2012

Coconut, Banana, Pineapple Smoothie


What to do when it hits -1F outside? Make tropical smoothies of course! Coconut milk is very good. Don't know if there are any health benefits but it's good. This one for sure hit the spot. Last day before my grocery store run so, resources were fairly slim. I had some frozen pineapple in the freezer but no frozen bananas left and the coconut milk in the fridge.....just enough for 2. I'm pretty sure that if a person where to have canned pineapple (drained) and a frozen banana, it quite possibly would have the same effect. YUM.

1/2 cup lite coconut milk
1/2 cup frozen pineapple
2 bananas
water
ice (about 1/4 cup)

Place them all, except for the water in the blender and liquify that bad boy! It may need to be "pulsed" to get everything smooth. Open up the top and add water slowly until desired consistency. Divide among 2 glasses. Another yummy smoothie that I've tried is a green smoothie. Don't let the name or color fool you. It's pretty good.

Labels: , , , , , ,

Monday, January 16, 2012

Carrot Apple Muffins much?


So I figured out why I have a weight problem......I eat to much. I know, rocket science right? Go figure. Lately I've been on a semi health kick (so lets just forget about the the girlscout cookies I just bought....Okay?).

Maybe my train of thought is similar to slamming my head against a brick wall but, if I think that if I encourage my kids to eat healthy, that might rub off on me......in other words, maybe that metaphorical brick wall will actually shatter. After all, I do have a pretty hard head. (My stylist tells me so, so it must me true.)

My only saving grace when it comes to overeating is that I go to the gym and I eat at home almost all the time. Actually, to keep it serious for a split second, I do try to eat healthy.....my obsession with food does have a positive side effect. Most of the things I eat tend to be on the less processed side of things. I cook at home not just because I want to eat healthier but because it's cheaper and really, it creeps me out to eat out all the time......after all, do I really know whats going in my food when a perfect stranger is making it? Do I really know if they washed their hands before they left the bathroom? What are the health and safety standards in Germany? When food is made under a different agenda (out of profit margins instead of "love") the ingredients can magically change.

Before I left Sacramento we were planting veggies and fruit in the back yard and I was contemplating having a couple of chickens, maybe I bat house set up, and a bee hive in the back. Yeah, my husband who is in the environmental business thinks I'm an absolute granola-crunching-tree-hugging-nut-case but, still he must endure all of my deep thoughts (Through better or worse right?).

Readers may notice I am not perfect with my ideals.... In fact, if a reader is on some witch hunt for hypocrites he can stop right here.....I am one. I go out to eat and I do enjoy junk food. But, it's because I'm not perfect. I guess the point is that I'm striving for it (perfection). That's the point of it all right? -'Every effort is a success, even if you don't see the results'

So let me not stray entirely from my title and get all preachy which, I tend to do sometimes....making the average reader nauseated.

Carrot Apple Muffins.

Our family loves blueberry muffins on weekend mornings. I like them too. I can freeze them and then nuke them later in the microwave during the week. Despite our muffin love affair, these little delicious boogers are made with sugar and white flour. The only redeeming quality is that they are made with blueberries and not chocolate chips. (That's like telling myself that I can have 2 lunches because I did an hour on the elliptical....completely justifiable right?) To switch things up I found and touched up a recipe to make my own. Carrot Apple Muffins. These are pretty darn yummy. My recipe calls for apple sauce but I'd imagine grated apple with a dash of lemon zest could possibly make a tasty alternative. I'll have to try it out and possibly update.

Makes 12 muffins


  • 1 1/4 cups whole wheat flour
  • 1/4 cup sugar
  • 1 teaspoon ground cinnamon
  • 1/2 tsp. baking powder
  • 1/2 tsp. baking soda
  • 1/4 tsp. salt
  • 1 cup packed finely grated carrots (about 2 med. size carrots grated)
  • 1/2 cup applesauce (preferably unsweetened but any kind will do)
  • 2 large eggs
  • 1/4 cup vanilla unsweetened almond milk (again with the almond milk she says! Oy vey!)
  • 1/4 cup canola oil


  1. Preheat oven to 450F (230C)
  2. Spray muffin with non-stick cooking spray or line cups with papers
  3. In a med/large bowl combine dry ingredients
  4. In a med/small bowl combine wet ingredients (this includes the apple and carrot)
  5. Pour wet ingredients in with dry ingredients and combine
  6. Spoon batter into muffin tin cups
  7. Bake for about 20 (do the toothpick test)
  8. Let them cook for as many minutes as you can stand and then serve with butter/margerine or plane.
I tried them with margarine and I say "barf" but my husband liked them better this way. So to each their own I guess. (what a weirdo.... Love you hon!)

Labels: , ,

Saturday, January 14, 2012

My Favorite Smoothie

......So far anyway. I have to say that smoothies are not really my favorite to make. I can't really seem to simplify the process. Pull out the blender, pull out the transformer (that, by the way weighs about 20 pounds), put ingredients in, blend, take apart blender and clean. YUCK. Too many bloomin' steps. I like smoothies when I can buy them... not make them. But in Germany, I am far, far, far away from my favorite smoothie joint (I'll give you a hint, it rhymes with Mamba Moose).

One of my husband's favorite flavors from this joint is a smoothie with peanut butter. It's pretty good however, it is freaking loaded with girth and calories. Usually after a person drinks this concoction, one feels as though they have a brick in their stomach.

After a little research and experimentation, I've created my own easy concoction that fits the bill. No, it doesn't taste exactly like the magical drink in the Styrofoam cup... however, like I said, it fits the bill and it's easy to make and I don't end up with lumps in my smoothie (do not like lumpy smoothies... a little bit of an oxymoron right?)

Whoever hasn't tried almond milk is missing out. Truly. It has a history. It's not just some new fandangled thing that has made it's way to the shelves. It's low in sugar and calories, and it's fabulous for baking too. It's now been voted in as a must for our weekend pancakes because my family has concluded it taste better than regular milk pancakes. I like it in my cereal but my kids don't. I tried to get my toddler on it but he was too far gone into the depths of moo juice. No worries though, I don't hate milk... just excited about being able to replace it from time to time in certain things.

Another thing I love, love, love about this is that it's vegan, raw, and parve... so, go ahead and have a smoothie and a "HN" hot dog, la'chaim!

My children don't like this recipe. My husband and I both enjoy this one A LOT. My eldest doesn't like bananas and my other one... well he doesn't even really like milkshakes (a strange, strange individual). Try it with your kids though, if they are the normal types... and see if they enjoy it.

The only complication in this recipe is that the bananas need to be sliced and frozen solid. I've done it with room temp bananas and I don't like the texture and temperature of it. What I've done in the past few years is just slice up my brown bananas and freeze them. One more thing to do with over-ripe bananas besides making banana bread.

So, here goes:

1 1/2 cup unsweetened vanilla almond milk
3 Tbsp. almond butter (regular peanut butter works in a pinch)
2 Bananas that have been sliced and frozen

Place all ingredients in your blender and liquify. Apparently this is two servings (p'shaw right)... I will sometimes enjoy this for lunch when I'm in a hurry.

Labels: , , , , , ,

Sunday, December 18, 2011

Nicki's Vegetarian Chili

I've been on this vegetarian recipe kick for a while. I'm trying to come up with my very own recipes for things. It started when I tried to be more observant of Jewish kosher laws. It can be difficult because....well, I'm in Germany and, bratwurst is GOOD. Lately though, I realizing that having a mostly vegetarian diet is just easier when it comes to keeping kosher. Plus, it can be a lot healthier. This so far has been my favorite combination for chili. I'm not so sure about the nutritional information but maybe some other reader genius could figure it out for me. I know that most likely the sodium content is high because of all the canned beans but it's easy and with two young kids, that's what I need.

Nicki's Veggie Chili

1 carrot, diced
2 celery stalks, diced
1 medium onion, chopped
1 red bell pepper (or 2 depending on your preference I use one cause, it's cheaper)
2 cloves of garlic, crushed
2 cans of kidney beans
1 can black beans
1 28oz. can of tomato
1 can of chopped green chilies (I use a small can of Old El Paso)
2 teaspoons of cumin
1 teaspoon of chili powder
2 Tablespoons of oil (for sauteing)
Shredded Cheese or Sour Cream (Optional)


We are a mild tongued family for the most part. (at least my kidlets are) The canned green chilies add some flavor but no real spice. If you'd like it spicier use a tablespoon or so of chilies in adobo sauce. It adds more heat and has a nice smokey flavor.

In a large pot, saute all the vegetables until tender (about 5-10 minutes). Add spices and stir them in with the vegetables. Then place all of the canned beans, tomato and chilies in with the vegetables and stir to combine. Simmer for 20 minutes or more depending on your preference of vegetable consistency. Serve with shredded cheese on top or just plain.

I'd imagine this is pretty healthy. Again, sodium might be an issue for some. In which case, try dried beans (3 cups of kidney & 1 cup of black--cooked and water according to preference) also, an easy way to cut the sodium is to look at the content of sodium in different brands of canned items. One can of tomatoes that I used had double the sodium of another brand.

This makes about six 2-cup servings and it's pretty inexpensive. I'll have to price everything out once I have a chance. Once one has the recipe down, it takes 30 minutes or less to get everything done and on the table. If a person is using dried beans it takes much longer (possibly can be an overnight thing to prep the beans) I usually have most of these items in the house. The celery I usually have on it's last leg before I decide that I should probably make use of it before it ends up in compost. My husband loves this recipe. He's not vehemently against this whole vegetarian exploration.....just weirds him out a bit but, he's getting better. The idea that it can be cheaper at the grocery store is turning him.

Labels: , , , , ,

Friday, March 11, 2011

Veg Head

My Aunt Susan gave me this vegetarian cookbook for Christmas about 2 years ago I think and it's been sitting on the shelf ever since. Because of the lack of internet, I depended more on my cookbooks. This lead to me discovering some recipes I had never tried before and trying out some of the recipes in this book, "Totally Vegetarian" by Toni Fiore. She hosts the PBS show "Delicious TV's Totally Vegetarian" The first recipe I tried I was really excited about because it could possibly be used again as a sauce over something instead of just Fettuccine Alfredo. I'm trying to stick to a more kosher diet and this is a great replacement for a creamy sauce over sauteed or baked chicken. Totally dairy free (unless the Parmesan cheese is added on top).

I started wondering about using this sauce on a pizza as well. I served it up with the Parmesan on top and all my boys were none the wiser. They sincerely believed it was an Alfredo sauce until I told them. I'm not trained chef but this was good enough for me to make this a regular in our home. The Author suggests this as a sauce to spoon over green beans or asparagus (a nice white sauce over asparagus for Easter?)

Here Goes:

Fettuccine Walnut Alfredo

  • 1/2 lb. fettucine (or whatever is in the pantry)
  • 3/4 cup walnuts or walnut pieces
  • 1 garlic clove
  • 1/4 pine nuts
  • few sprigs of parsley (I didn't have this)
  • 2-3 Tbsp. extra virgin olive oil
  • Pinch of sea salt (I used kosher salt)
  • Freshly grated black pepper
  • Grated Parmesan (optional)
1. Cook pasta according to directions

2. Pulse half of the walnuts with the garlic in the food processor. Stop and scrape down the sides of the bowl with a spatula. With the processor running, add the remaining walnuts, the pine nuts, and parsley and then drizzle in the oil. When the sauce has a pesto-like texture, stop the processor and scrape down the sides of the bowl. The nuts should be very finely ground. Turn the machine on and slowly add 1/4 to 1/3 cup very hot water, checking the consistency to make sure the sauce doesn't become too thin. The sauce should begin turning white with a fluffy creamy texture. Stir in the salt.

3. Have a large deep pasta bowl handy. Quickly drain the pasta and drop into the bowl. Toss with about 5 tablespoons of sauce, more or less to taste. Serve immediately with a few grinds of black pepper and Parmesan, if desired.

The next recipe is definitely more along the lines of a "cruncher" recipe as my husband would so eloquently put it! I also was trying out vegetarian recipes not only because they are healthy but also because they can be a lot cheaper. This is one of those that I picked out to be cheaper. Mike and I really enjoyed it but unless the kids eat beans regularly, this may be something they give the stink eye to.

I ended up having to add a little more water in the end to suit my consistency preference. The lemon at the end it nice. I'm sure there are a ton of variations that can be done with this. I'm definitely planning on making it again.

Lentil Stew

3 Tbsp. extra virgin olive oil
1 Large yellow onion, chopped
2 celery stalks, diced
2 garlic cloves, finely chopped
1/2 cup parsley chopped (I only had left over cilantro.....so, I didn't use the parsley)
1 1/2 cups lentils
4 cups vegetable stock or water
1 lemon
2-4 cups baby spinach, torn (optional)
chopped cilantro, mint, or additional parsley, to taste

1. Heat a heavy stockpot or Dutch oven over medium-high heat and add the olive oil. After a minute, add the onion and celery. Saute gently until translucent, 5-7 minutes. Add the garlic and saute for a few minutes longer. Add the parsley and stir well to combine. Add the lentils and stock and bring to a boil. Immediately reduce the heat and gently simmer until lentils are tender, about 30 minutes. Just before serving, season with salt and pepper, a good squeeze of lemon juice, and a grating of fresh lemon zest to taste. Spoon the stew over a bed of fresh spinach if you life and top with chopped cilantro. Serve hot.

Labels: ,

Saturday, July 14, 2007

Giambotta (Italian Vegetable Stew)


Promise me not to cringe when reading "stew" at the top. I'm for the most part not a fan of stew. It usually has some sort of bean, rice, or pasta in it and although recipes encourage to save for leftovers, it just turns out to be this slimy gelatin consistency when pulled out of the fridge the next day. The worst is when there is some sort of fatty meat in it and the grease solidifies at the top. I just can't stomach it.

The reason why this recipe intrigued me, was because there was no pasta, rice, or beans in it, it was healthy comfort food, and for the most part very cheap and fast to make. All the meat eaters may scoff seeing that it's a vegetable dish but it can easily be made into a meat dish by adding some meatballs or Italian sausage.

The original recipe by Rachel Ray asks for canned fire roasted tomatoes. While I couldn't find those at the store, I did find "Italian" canned diced tomatoes with oregano, basil and garlic added and instead of using a regular large eggplant, I used 2 Ichiban or Japanese eggplants which are less bitter. Otherwise I followed the recipe almost exactly. I'm curious to maybe try some Japanese sweet potato or Japanese pumpkin in this next time and see what the results may be. The fresh basil really did the trick so I recommend spending the extra money to buy it at the market.

For left overs I recommend getting some whole grain hoagie rolls cut in half length wise and using the same method for them as the cheesy garlic bread then, plop some of the left over stew on the halved roll, top with some provolone cheese and enjoy! The potatoes don't get smooshy at all either.

  • 1/4 Extra Virgin Olive Oil plus more for drizzling
  • 1 bay leaf
  • 2 large potatoes
  • 1 zuchinni
  • 3 cloves of garlic (or whip out your huge jar of garlic from the fridge)
  • 1 eggplant (or 2 smaller eggplants)
  • 1 red bell pepper
  • salt & pepper
  • 1 28ounce can of fire roasted tomatoes
  • 1 cup stock (veggie or chicken)
  • 1/2 cup torn chopped basil (10-12 leaves)
  • loaf of whole grain bread
  • 1/2 romano or pecorino cheese

Heat soup pot over medium heat add olive oil, bay leaf, garlic and onion (quartered and then thickly sliced). Let them sweat while cutting other veggies into nice hearty chunks. As your cutting just drop them into the pot. Season with salt and pepper and cover and cook for 10 minutes. Uncover, add stock and tomatoes, cook another 5 minutes. Turn off heat and stir in basil (or, hold off and top each bowl of stew off with chopped basil)

Place bread slices in broiler after adding smashed garlic and drizzling with olive oil. Char, take them out and top generously with shredded pecorino. Place them back in the broiler to brown/melt cheese and serve.

Labels: , , , , ,

Tuesday, June 26, 2007

Pineapple Flan


The onslaught of recent family crises back home has made me feel powerless to help and constantly worried. I'm also going to finally go to college this upcoming fall which is another stress factor. I'm 26 and still don't have my degree. There are many reasons and excuses why I never went: I always was told I wasn't the school type which made me constantly feel inadequate as a student during my lessons (you know the whole power of suggestion thing?), not having someone there to pay for my schooling, working full time, not being familiar with the college system in terms of what classes I should take towards future success, not knowing what I wanted to work towards and an unexpected pregnancy (Josh) and marriage caused everything to be put just a tad on the back burner. Now that Josh is almost 4, he's on his way to preschool and I am on my way back as well. He proudly goes around saying, "Mommy is going to college and I'm going to school." I'm fresh out of excuses and am tired of getting the look of surprise every time I mention to a friend or acquaintance that I am only (gasp) High School educated. Mike has always said that because I come off as being so educated people look so surprised. However, I think it's a little more sinister than this. I believe it's because they think that people like me didn't exist in circles like theirs. Maybe that look of surprise is a little bit of both the above analogies. I'd hate to underestimate the love and respect that my friends have for me.

Besides reasons of self-esteem, I also want some sort of degree to hold as an insurance policy. Truthfully, I'm happy with who I am for the most part and extremely satisfied with being a stay at home mom. As my mother in law always says, "When all is said and done we all put our pants on the same way in the morning no matter what our background" However, if anything should happen to Mike, I want the comfort of knowing that I would be able to go back into the work force and make sufficient funds to support the family.

Although I'm excited about this upcoming challenge, I'm also nervous and stressed. My first step is taking a placement test. In preparation for this test, I'm brushing up on my math skills. I hate math and have always done awful in the subject. So as soon as I opened that math book for practice, those feelings of despair quickly set in.

Oh yes to add to all of this: Mike, Josh and I were all knocked out from a killer cold virus as well.

My way of dealing with stress is to cook, drink and or exercise depending on what the stressor is. Since I was deathly ill, exercising was nixed and because I am now a mother, responsible for another human life, drinking until I'm smashed is pretty much out of the question.....which leads solely to one conclusion: Cooking and baking like a crazy. Below you'll find 3 new additions to the recipe blog.

Mike has just recently taken on a private English student, an older Japanese business man who wants to brush up on his English skills for an upcoming presentation. He stated in his first lesson that he took a year of culinary school, so it's inspired/challenged me to make recipes he might find appealing.

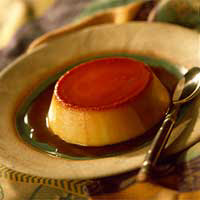
You'll need 6 ounce Flan cups for this recipe. Little metal cups you can probably pick up at any home store. These are fairly easy to make and when served on dessert plates, look very gourmet & pack an unexpected flavor. I usually am not a fan of flan (try saying those last 3 words 10 times fast!) However, I really enjoyed this.

1 1/4 cups sugar
8 extra-large eggs
2 cups unsweetened pineapple juice

Preheat oven to 350F

Spray flan cups with non-stick cooking spray. Put 3/4 cup sugar in a small nonstick skillet. Cook over medium-high heat and melt until dark brown liquid forms. Divide caramel among flan cups to coat bottom of each. Caramel will harden.

Separate 4 egg yolks and whites, saving whites for another use. In bowl of an electric mixer put 4 whole eggs, 4 egg yolks, and remaining sugar. Beat for 1 minute, until eggs and sugar are well blended.

Slowly add pineapple juice, little by little, and continue to mix until juice is incorporated. Do not let mixture become too frothy. With a ladle, divide evenly among 5 custard cups.

Place custard cups in a large, deep baking pan. Create a water bath by adding boiling water to the pan so that water level comes to 2/3 up the side of cups. Carefully place in oven. Bake for 40-45 minutes, until firm. Remove cups from water bath. Let cool, then refrigerate until very cold, preferably overnight.

When ready to serve, carefully unmold custard onto flat dessert plates, loosening the sides with a small sharp knife if necessary. Caramel will coat the top and sides of flan. Serve immediately.

Labels: , ,

Mayor Koch's Meringues


I made these super sweet cookies with the leftover egg whites that I had after making the above Pineapple Flan. Another Cooking 1-2-3 Recipe. Rozanne Gold at the age of 24 was the chef for New York's Mayor Ed Koch at the Gracie Mansion. She states that these satisfied his sweet tooth.These are very sugary sweet but easy to make and easy to mail in a care package as well. I think I made mine a tad to large the first time around but I think I will attempt these again. The fact that she instructs the reader to "let cool" after spending 12 hours in a cooling oven is beyond me but hey, it works so why knock it? Be sure to preheat your oven!!

3 extra-large egg whites
14 tablespoons sugar
1 1/4 cups miniature chocolate chips

Preheat oven to 375F

Line baking sheet with parchment paper.

In bowl of an electric mixer, beat egg whites until frothy. Add a pinch of salt and slowly add sugar. Beat for several minutes, until very stiff and glossy. The mixture should look like marshmallow fluff. Gently fold in chocolate chips and drop onto baking sheet by heaping tablespoons mounding meringue so it is at least 1 inch high.

Place in oven on middle rack and turn off oven immediately. Leave door closed for 12 hours. Remove from oven and let cool. These can be stored in a tightly-covered tin.

Labels: , , ,

Dark Moist Chocolate Cake


As the Author of Cooking 1-2-3, Rozanne Gold, so eloquently states, "If Original Sin were a cake, this would be it." Her recipes are simple when it comes to ingredients. Because it's flourless, it would make a fantastic Passover cake (just use kosher chocolate of course!) Although she recommends taking the cake out of the fridge for 1 hour before serving, I prefer cutting a stone cold wedge of it and eating it immediately out of the refrigerator. Mike prefers slathering peanut butter on the top or, pressing peanut butter chips into the top on his wedge before eating. Embellish how you like. It's divine.

16 ounces good-quality semisweet chocolate
10 tablespoons unsalted butter
5 extra-large eggs

Preheat oven to 350

Line the bottom of an 8 1/20-inch spring form pan with parchment paper or aluminum foil. Coat the inside of the pan with nonstick cooking spray.

Chop chocolate into pieces. Cut butter into small chunks. Place chocolate and butter in a double boiler or in a large metal bowl over simmering water, making sure bowl doesn't touch water. Melt, stirring frequently, until smooth. Remove from heat.

Whisk eggs and pinch of salt into bowl of an electric mixer, until mixture triples in volume, about 8 minutes. Fold chocolate mixture into egg mixture with a flexible rubber spatula until completely incorporated.

Pour mixture into prepared pan. Bake for 20 minutes. The center will still be a little soft. Remove from oven. Let cool at least 30 minutes before cutting. The center will sink a little as it cools. You can refrigerate the cake for up to 2 days (let it sit at room temperature for 1 hour before serving).

Labels: , , ,

Tuesday, April 03, 2007

Lemon Risotto


The ultimate comfort food!! Really there are no words to describe the yumminess of this recipe.

2 shallots
1 rib of celery
1/4 cup unsalted butter
1 tablespoon olive oil
1 1/3 cups risotto rice , Arborio
approx. 1 quart vegetable stock
zest and juice of 1/2 lemon
needles from 2 small sprigs of fresh rosemary, finely chopped
1 egg yolk
4 tablespoons heavy cream
sea salt to taste
freshly ground pepper to taste

Put the shallts and clery into a mini food processor and blitz until they are finely chopped mush. Heat half the butter and oil and the shallot and celery mixture in a wide saucepan, and cook to soften the mixture for about 5 min. making sure it doesn't stick. Mix in the rice, stirring to give it a good coating of oil and butter. Meanwhile, heat the stock in another saucepan and keep in at the simmering point.

Pour a ladleful of stock into the rice and keep stirring until the stock in absorbed. Then add another ladleful and stir again. Continue doing this until the rice is al dente. You may not need all the stock, equally, you may need to add hot water from the kettle.

Mix the lemon zest and rosemary int o the risotto, and in a small bowl beat the egg yolk, lemon juice, Parmesan and cream and pepper.

When the risotto is ready-when the rice is no longer chalky, but still has some bite-take it off the heat and add the bowl of eggy, lemony mixture, and the remaining butter and salt to taste. Serve with more grated Parmesan if you wish, check the seasoning and dive in.

Labels: , ,

Sunday, January 28, 2007

Puffed Oven Pancake


I finally had a chance to try this out once I replaced my 10 inch skillet with one that had a metal handle so, I could easily transfer it from stovetop to oven.

I went on a small hunt for a German Pancake recipe online when I first tried this puffed pastry at The Original Pancake House in San Diego. At this restaurant, it's called The Dutch Baby and, is served to one person. However, in my Better Homes and Gardens book it says it serves 6.......hmmm maybe this is an indication that serving sizes have gotten out of control? Actually, maybe with a large fruit salad on the side this recipe could serve 6. Otherwise, plan on a side for even your family of 4.

It's super easy and makes a great presentation for a small brunch party. I usually top it off with powdered sugar and fresh lemon juice. YUM! It can also be topped off with traditional whipped butter and syrup, honey, jam, fresh fruit, etc.

The main reason I am including this in my blog is that soon, I will be headed off to the states and locked in my mothers kitchen to cook for my younger brother and sister. I don't mind. To me, it's time off while my mom spoils Josh. I'll be putting this blog to good use though considering I can't take my cook books!

2 Tbsp. butter
3 eggs
1/2 cup all-purpose flour
1/2 milk
1/4 tsp. salt
3 cups sliced fresh fruit (strawberries, nectarines, pears, or peeled peaches) Powdered sugar or whipped cream. (optional)

1. Place butter in a 10-inch ovenproof skillet. Place in a 400 degree oven for 3-5 minutes or till butter melts. In a medium mixing bowl use a wire whisk or rotary beater to beat eggs till combined. Add flour, milk, and salt. Beat till mixture is smooth. Immediately pour into the hot skillet. Bake about 25 minutes or till puffed and well browned.

2. Top with fruit. if desired, sprinkle with powdered sugar or top with whipped cream. Cut into wedges and serve warm. Makes 6 servings.

Labels: , ,